# Web Development with Next.js
# Single Page Applications
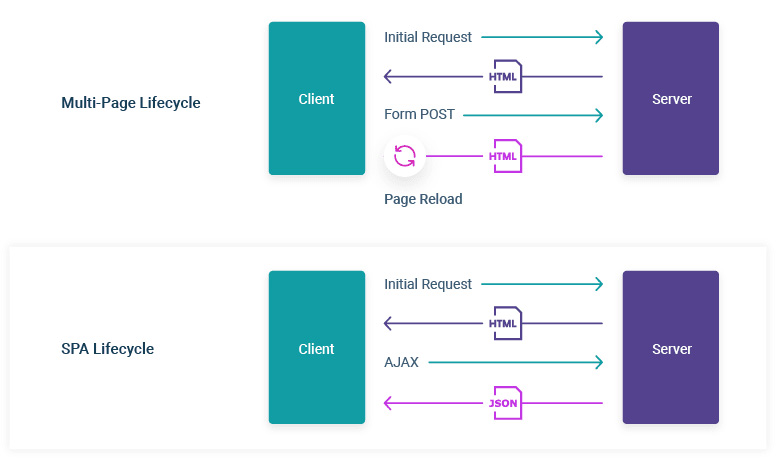
Single Page Applications (SPAs) and Multi-Page Applications (MPAs) are architectural patterns for building web applications.
SPAs are reactive web applications that give a native look and feel without page loads. SPAs owe this to AJAX+Client-Side Rendering typically provided by a client-side framework such as react/vue/angular.
AJAX stands for Asynchronous JavaScript And XML. It is the use of the XMLHttpRequest object to communicate with servers. It can send and receive information in various formats, including JSON, XML, HTML, and text files.
Many in the industry refer to more traditional web applications as Multi-Page Applications (MPAs). Such applications are comprised of multiple webpages that the user navigates between.
# What is Rendering
Rendering is the conversion of the source code written in a reactive framework (React/Vue/AngularJS) into the HTML representation of your User Interface. Rendering can take place
- on the server or
- on the client.
It can happen either
- ahead of time at build time, or
- on every request at runtime.
With Next.js, three types of rendering methods are available:
- Server-Side Rendering: On the client, the HTML is used to show a fast non-interactive page, while React uses the JSON data and JavaScript instructions to make components interactive. This process is called hydration.
- Static Site Generation, and
- Client-Side Rendering.
# Server-Side Rendering (SSR)
Server-Side Rendering and Static Site Generation are also referred to as Pre-Rendering because the fetching of external data and transformation of components into HTML happens before the result is sent to the client.
Imagine you're at a restaurant. You order a dish, and the kitchen (the server) prepares your meal completely and serves it to you ready to eat. This is like server-side rendering.
- How it Works: When you visit a website, the server prepares the entire webpage on the server itself. It processes the HTML, CSS, and JavaScript, and then sends the fully rendered page to your browser. Is what we did in the Jekyll labs.
- Advantages: The main advantage is that the webpage is ready to be displayed as soon as it loads, which can be good for SEO (Search Engine Optimization) and for users who need to see the content immediately.
- Disadvantages: Every time you request a new page, the server has to prepare the whole page from scratch, which can take more time and resources.
# Client-Side Rendering (CSR)
Now, imagine you're at a self-service buffet. You get an empty plate (a basic webpage structure), and you fill it with food (content and features) yourself. This is like client-side rendering.

- How it Works: When you visit a website, the server sends a minimal, basic structure of the webpage. Your browser (the client) then uses JavaScript to load the content and build the page. This process happens on your device.
- Advantages: Once the initial setup is loaded, navigating to different parts of the website can be very fast, as only new content needs to be loaded, not the entire page.
- Disadvantages: The initial load might take longer, and if a user has JavaScript disabled or if it fails to load, they might not be able to see the website properly. Also, it can be less favorable for SEO.
# Server Components
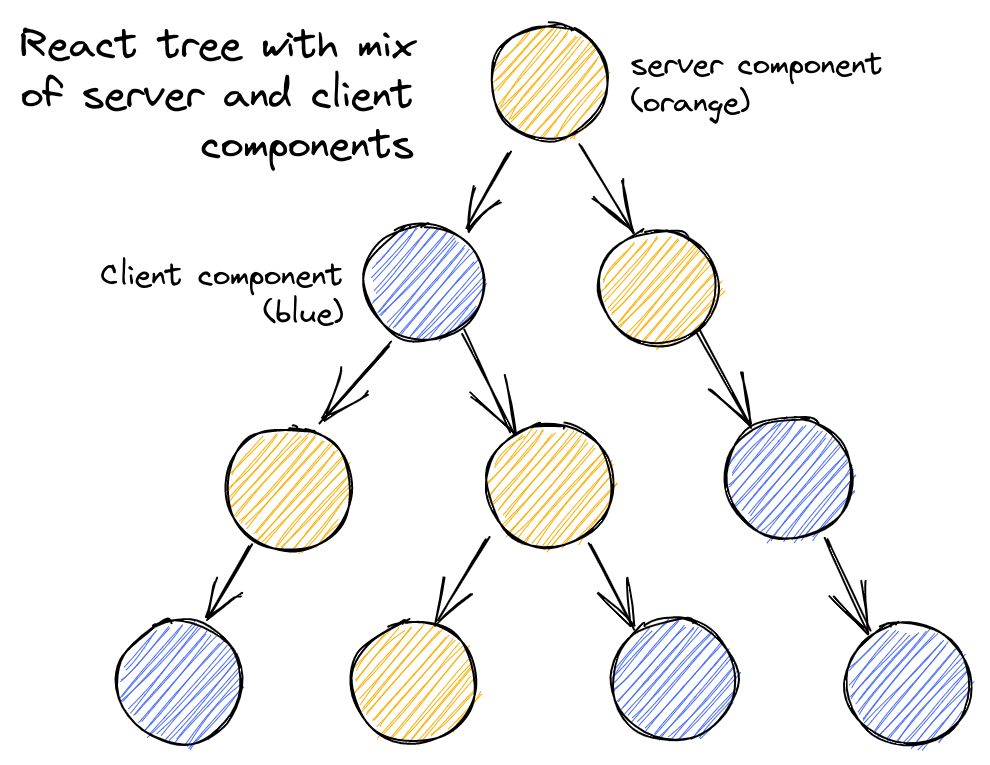
React Server Components (opens new window) allow you to write UI that can be rendered and optionally cached on the server. They allow the server and the client (browser) to collaborate in rendering your React application. Here’s a quick illustration from the React team, showing what the end goal is: a React tree, where the orange components rendered on the server, and blue components are rendered on the client.
Imagine you're building a model airplane. Some parts of the airplane (like the wings and body) are pre-assembled at the factory (the server), while other parts (like the decals and paint) are added by you at home (the client).
In web development, a server component works similarly:
Pre-Assembled at the Server: Server components are parts of a web page that are prepared and assembled on the server (the factory in our analogy). This means the server does the heavy lifting of creating these components before sending them to the user's browser. Server Components allow you to keep sensitive data and logic on the server, such as tokens and API keys, without the risk of exposing them to the client.
Sent to the Client: Once these components are ready, they are sent to the client (your browser, like your home in the analogy). The client then displays these components as part of the web page.
Efficiency: Because these components are processed on the server, they can reduce the amount of work the client's browser has to do. This can make the web page load faster and run more smoothly, especially on devices with less processing power.
Use Case: Server components are particularly useful for parts of a web page that don't need to change often or don't require immediate interaction from the user. For example, a server component might be used for a navigation menu that stays the same on every page of a website.
In summary, server components are like pre-assembled parts of a web page. They are prepared on the server and then sent to the client's browser, making the web page more efficient and faster to load.
# Origin Servers, CDNs and Edges
# Origin Servers
The origin server refers to the main computer that stores and runs the original version of your application code. When an origin server receives a request, it does some computation before sending a response. The result of this computation work can be moved to a CDN (Content Delivery Network).
# Content Delivery Network
CDNs store static content (such as HTML and image files) in multiple locations around the world and are placed between the client and the origin server. When a new request comes in, the closest CDN location to the user can respond with the cached result.

# The Edge
Edge servers are distributed to multiple locations around the world. Unlike CDNs, which store static content, Edge servers can run small snippets of code. Edge computing supports not only transmitting cached data but other types of computing like live streaming and gaming.
# The pages folder
In Next.js, a page is a
- React Component. A React Component is a function that returns a UI element and can receive props as input.
- exported from a
.js,.jsx,.ts, or.tsxfile and - it must be in the
pagesdirectory.
Each page is associated with a route based on its file name.
The index.js file is the main page / for the app.
Pages can also be added under src/pages as an alternative to the root pages directory.
The src directory is very common in many apps and Next.js supports it by default.
Example: If you create pages/about.js that exports a React component like below, it will be accessible at /about.
export default function About() {
  return <div>About</div>
}
2
3
# References
See https://nextjs.org/docs/basic-features/pages (opens new window)
# The pages folder: Dynamic routes
Next.js also supports pages with dynamic routes (opens new window).
For example, if you create a file called pages/posts/[id].js, then it will be accessible at posts/1, posts/2, etc.
See the full code of the examples used in this section in the repo ULL-MII-SYTWS/nextjs-dynamic-routes (opens new window)
➜  nextjs-dynamic-routes tree -I node_modules
.
├── README.md
├── package-lock.json
├── package.json
└── pages
    ├── index.jsx
    └── post
        ├── [pid]
        │   └── [comment].js
        └── [pid].js
2
3
4
5
6
7
8
9
10
11
Consider the following page pages/post/[pid].js:
import { useRouter } from 'next/router'

const Post = () => {
  const router = useRouter()
  console.log(router.query)
  const { pid } = router.query
  return <p>Post: {pid}</p>
}

export default Post
2
3
4
5
6
7
8
9
10
Any route like /post/1, /post/abc, etc. will be matched by pages /post/[pid].js.
The matched path parameter will be sent as a query parameter to the page, and it will be merged with the other query parameters.
For example, The page pages/post/[pid]/[comment].js
import { useRouter } from 'next/router'

const Comment = () => {
  const router = useRouter()
  console.log(router.query)
  const { pid, comment } = router.query

  return <p>pid: {pid} Comment: {comment}</p>
}

export default Comment
2
3
4
5
6
7
8
9
10
11
will match the route /post/abc/a-comment and its query object will be:
{ "pid": "abc", "comment": "a-comment" }
➜  openai-quickstart-node git:(main) ✗ npx next --version
Next.js v12.1.6
2
Client-side navigations to dynamic routes are handled with next/link (opens new window). If we wanted to have links to the routes used above it will look like this:
import Link from 'next/link'

function Home() {
  return (
    <ul>
      <li>
        <Link href="/post/abc">Go to pages/post/[pid].js</Link>
      </li>
      <li>
        <Link href="/post/abc?foo=bar">Also goes to pages/post/[pid].js</Link>
      </li>
      <li>
        <Link href="/post/abc/a-comment">
          Go to pages/post/[pid]/[comment].js
        </Link>
      </li>
    </ul>
  )
}

export default Home
2
3
4
5
6
7
8
9
10
11
12
13
14
15
16
17
18
19
20
21
NextJS provides through next/link a React component called Link to do client-side route transitions.
See Introduction to Routing (opens new window) in the NextJS docs.
See the code at ULL-MII-SYTWS/nextjs-dynamic-routes (opens new window)
# Exercise on Dynamic Routes
Follow the tutorial Dynamic Routes (opens new window) at https://nextjs.org/learn/basics/dynamic-routes (opens new window) and solve the exercises.
# next.js pages/api folder
Any file inside the folder pages/api is mapped to /api/* and will be treated as an API endpoint instead of a page.
They are server-side only bundles and won't increase your client-side bundle size. See the section API Routes (opens new window) introduction.
Each page is associated with a route based on its file name.
Since we have the file pages/api/generate.js, Next.js will make it accessible at the route /api/generate.
Create a file called hello.js in pages/api with the following code:
export default function handler(req, res) {
  res.status(200).json({ text: 'Hello' });
}
2
3
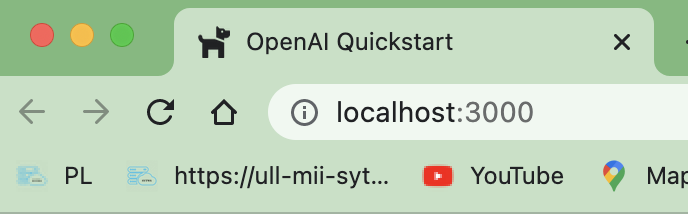
Try accessing it at http://localhost:3000/api/hello (opens new window). You should see {"text":"Hello"}. Note that:
reqis an instance of http.IncomingMessage (opens new window), plus some pre-built middlewares (opens new window).resis an instance of http.ServerResponse (opens new window), plus some helper functions (opens new window).
Functions exported by files inside the folder pages/api can be deployed as Serverless Functions (also known as Lambdas).
API Routes can be dynamic, just like regular pages.
# Serverless Functions
A serverless function (opens new window) is a piece of code that is executed in response to a specific event, such as an HTTP request or a message being added to a queue. It is called "serverless" because the developer does not have to worry about the underlying infrastructure that the code will be running on. Instead, the infrastructure is managed by a third party, such as AWS Lambda or Google Cloud Functions.
The developer only needs to provide the code and specify the events that should trigger the code to be executed. The serverless provider takes care of the rest, including automatically scaling the function to handle a large number of requests.

# pages/api/generate.js
See https://www.npmjs.com/package/openai (opens new window). Check out the full API documentation (opens new window) for examples of all the available functions in openai.
import { Configuration, OpenAIApi } from "openai";

const configuration = new Configuration({
  apiKey: process.env.OPENAI_API_KEY,
});
const openai = new OpenAIApi(configuration);

export default async function (req, res) {
  const completion = await openai.createCompletion({
    model: "text-davinci-002",
    prompt: generatePrompt(req.body.animal),
    temperature: 0.6,
  });
  res.status(200).json({ result: completion.data.choices[0].text });
}

function generatePrompt(animal) {
  const capitalizedAnimal =
    animal[0].toUpperCase() + animal.slice(1).toLowerCase();
  return `Suggest three names for an animal that is a superhero.

Animal: Cat
Names: Captain Sharpclaw, Agent Fluffball, The Incredible Feline
Animal: Dog
Names: Ruff the Protector, Wonder Canine, Sir Barks-a-Lot
Animal: ${capitalizedAnimal}
Names:`;
}
2
3
4
5
6
7
8
9
10
11
12
13
14
15
16
17
18
19
20
21
22
23
24
25
26
27
28
For a Nextjs API route (opens new window) to work, you need to export a function as default (a.k.a request handler), which then receives the following parameters:
req: An instance ofhttp.IncomingMessage, plus some pre-built middlewaresres: An instance ofhttp.ServerResponse, plus some helper functions
# Environment: process.env.OPENAI_API_KEY
Next.js allows you to set environment variables in
.env(all environments),.env.development(development environment), and.env.production(production environment)..env.localalways overrides the defaults set.
The variables are accesible into process.env.
By default environment variables are only available in the Node.js environment, meaning they won't be exposed to the browser.
# Exposing Environment to the browser
In order to expose a variable to the browser you have to prefix the variable with NEXT_PUBLIC_.
# Vercel: Environment Variables
When deploying your Next.js application to Vercel, Environment Variables can be configured in the Project Settings (opens new window).
# Netlify: Environment Variables
In Netlify you can use the Netlify UI. Head over to the Build & Deploy settings in your Site Settings, and then plug your values in under "Environment variables" or alternatively, use the Netlify CLI (opens new window)
# References
# Request and Response objects: export default async function (req, res) { ... }
The Server Request Object (req) includes a set of
Express.js-like helper methods to improve the developer experience and increase the speed of creating new API endpoints:
req.cookies- An object containing the cookies sent by the request. Defaults to{}req.query- An object containing the query string. Defaults to{}req.body- An object containing thebodyparsed bycontent-type, ornullif no body was sentSee the code fragment
generatePrompt(req.body.animal)
The Server Response object, ( abbreviated as res) includes a set of
Express.js-like helper methods to improve the developer experience and increase the speed of creating new API endpoints:
res.status(code)- A function to set the status code. code must be a valid HTTP status coderes.json(body)- Sends a JSON response. body must be a serializable objectres.send(body)- Sends the HTTP response. body can be a string, an object or a BufferSee the code fragment
res.status(200).json({ result: completion.data.choices[0].text });res.redirect([status,] path)- Redirects to a specifiedpathor URL.statusmust be a valid HTTP status code.- If not specified,
statusdefaults to "307" "Temporary redirect". - If
pathstarts with "http" or "//", the redirect is external.
- If not specified,
# OpenAI Completions: const completion = await openai.createCompletion({ ... })
See the documentation at https://beta.openai.com/docs/api-reference/completions/create (opens new window)
It makes a POST request to https://api.openai.com/v1/completions (opens new window):
In the JSON body goes:
model:IDof the model to use. You can use the List models API to see all of your available modelsprompt: string to generate completions for, encoded as a string, array of strings, array of tokens, or array of token arrays.temperature: Higher values means the model will take more risks. Try 0.9 for more creative applications, and 0 for ones with a well-defined answer.
The response is a JSON object with the following fields:
{
  "id": "cmpl-uqkvlQyYK7bGYrRHQ0eXlWi7",
  "object": "text_completion",
  "created": 1589478378,
  "model": "text-davinci-003",
  "choices": [
    {
      "text": "\n\nThis is indeed a test",
      "index": 0,
      "logprobs": null,
      "finish_reason": "length"
    }
  ],
  "usage": {
    "prompt_tokens": 5,
    "completion_tokens": 7,
    "total_tokens": 12
  }
}
2
3
4
5
6
7
8
9
10
11
12
13
14
15
16
17
18
19
# pages/index.js
The index.js file inside the pages directory is the page that is rendered when the user visits the root of your application.
It exports a React component that renders the home page.
There are three core concepts of React that you'll need to be familiar with to start building React applications. These are:
In Next.js, a page is a React Component exported from a .js, .jsx, .ts, or .tsx file in the pages directory.
Each page is associated with a route based on its file name.
thus, index.js is a page and index.module.css is a module.
import Head from "next/head";
import { useState } from "react";
import styles from "./index.module.css";

export default function Home() {
  const [animalInput, setAnimalInput] = useState("");
  const [result, setResult] = useState();

  async function onSubmit(event) {
    event.preventDefault();
    const response = await fetch("/api/generate", {
      method: "POST",
      headers: {
        "Content-Type": "application/json",
      },
      body: JSON.stringify({ animal: animalInput }),
    });
    const data = await response.json();
    setResult(data.result);
    setAnimalInput("");
  }
  return (
    <div>
      <Head>
        <title>OpenAI Quickstart</title>
        <link rel="icon" href="/dog.png" />
      </Head>

      <main className={styles.main}>
        <img src="/dog.png" className={styles.icon} />
        <h3>Name my pet</h3>
        <form onSubmit={onSubmit}>
          <input
            type="text"
            name="animal"
            placeholder="Enter an animal"
            value={animalInput}
            onChange={(e) => setAnimalInput(e.target.value)}
          />
          <input type="submit" value="Generate names" />
        </form>
        <div className={styles.result}>{result}</div>
      </main>
    </div>
  );
}
2
3
4
5
6
7
8
9
10
11
12
13
14
15
16
17
18
19
20
21
22
23
24
25
26
27
28
29
30
31
32
33
34
35
36
37
38
39
40
41
42
43
44
45
46
# JSX
JSX stands for JavaScript eXtended markup language. JSX is a syntax extension for JavaScript that allows you to describe your UI in a familiar HTML-like syntax. This code is JSX:
(
    <div>
      <Head>
        <title>OpenAI Quickstart</title>
        <link rel="icon" href="/dog.png" />
      </Head>

      <main className={styles.main}>
        <img src="/dog.png" className={styles.icon} />
        <h3>Name my pet</h3>
        <form onSubmit={onSubmit}>
          <input
            type="text"
            name="animal"
            placeholder="Enter an animal"
            value={animalInput}
            onChange={(e) => setAnimalInput(e.target.value)}
          />
          <input type="submit" value="Generate names" />
        </form>
        <div className={styles.result}>{result}</div>
      </main>
    </div>
  );
2
3
4
5
6
7
8
9
10
11
12
13
14
15
16
17
18
19
20
21
22
23
24
It’s possible to use JavaScript inside JSX using curly braces.
The example below sets the value property of the input
to the variable animalInput and the onChange property to a function that updates the animalInput variable to the value written by the user inside the input box:
<input type="text" name="animal" placeholder="Enter an animal"
    value={animalInput}
    onChange={(e) => setAnimalInput(e.target.value)}
/>
2
3
4
The nice thing about JSX is that apart from following three JSX rules (opens new window), you don’t need to learn any new symbols or syntax outside of HTML and JavaScript:
- Return a single root element: To return multiple elements from a component, wrap them with a single parent tag.
- Close all the tags: self-closing tags like
<img>must become<img /> - camelCase most of the things: For example, instead of
stroke-widthyou usestrokeWidth. Sinceclassis a reserved word, in React you writeclassNameinstead. Event names are also camelCased
# Comments to import Head from "next/head"
nextjs provides a built-in component for appending elements to the head of the page so that it can
be used in the JSX of the page:
<Head>
   <title>OpenAI Quickstart</title>
   <link rel="icon" href="/dog.png" />
</Head>
2
3
4
# Comments to import styles from "./index.module.css"
This is a CSS module (opens new window).
Next.js supports CSS Modules using the [name].module.css file naming convention.
CSS Modules locally scope CSS by automatically creating a unique class name.
This allows you to use the same CSS class name in different files without worrying about collisions.
We can then use the styles object like in:
<img src="/dog.png" className={styles.icon} />
or in this:
<div className={styles.result}>{result}</div>
# Comments to <link rel="icon" href="/dog.png" />
This line in the <Head> component adds a favicon to the page.
You'll find the image in the public directory.
Next.js can serve static files, like images, under a folder called public in the root directory.
Files inside public can then be referenced by your code starting from the base URL (/).
# Comments to <main className={styles.main}> Curly Braces in JSX
JSX lets you write HTML-like markup inside a JavaScript file, keeping rendering logic and content in the same place.
Sometimes you will want to add a little JavaScript logic or reference a dynamic property inside that markup.
In this situation, you can use curly braces in your JSX to open a window to JavaScript: <main className={styles.main}>
The only reason behind the fact that JSX uses className over class is that the class is a reserved keyword in JavaScript.
We are specifying that the <main> element should use the main class from the index.module.css file.
# Comments to <form onSubmit={onSubmit}> ...</form>
The onSubmit prop is a special React prop that lets you specify a function that will be called when the form is submitted.
The async function onSubmit is called when the form is submitted:
  async function onSubmit(event) {
    event.preventDefault();
    const response = await fetch("/api/generate", {
      method: "POST",
      headers: {
        "Content-Type": "application/json",
      },
      body: JSON.stringify({ animal: animalInput }),
    });
    const data = await response.json();
    setResult(data.result);
    setAnimalInput("");
  }
2
3
4
5
6
7
8
9
10
11
12
13
# Comments to const response = await fetch("/api/generate", { ... })
The fetch function makes a request to the /api/generate endpoint of the nextjs server.
Thus, the exported function in pages/api/generate.js is called and the JSON returned at line
res.status(200).json({ result: completion.data.choices[0].text });
will be received in data after the second await:
const data = await response.json()
# State in React
# React States
React states are used to store data that can be changed over time.
In that sense, they are similar to variables declared with the let keyword.
The difference between a React state and a normal variable is that when a React state variable changes, the component is rendered again and some other things happens, but when a normal variable changes, this does not happen.
# The useState hook
The useState hook allows us to create state variables for our components.
const [state, setState] = useState(initialState);
useState takes in an initial value as an argument and returns an array containing
- the state variable and
- a setter function
setStateto mutate it
During the initial render, the returned state (state) is the same as the value passed as the first argument (initialState).
The setState function is used to update the state. It accepts a new state value and enqueues a re-render of the component.
setState(newState);
During subsequent re-renders, the first value returned by useState will always be the most recent state after applying updates.
It is common practice to de-structure this array and set its contents to be const.
This is because
- the state variable should never be reassigned directly and
- should only be modified via the setter function.
The setter function accepts either
- a new value or
- If the new state is computed using the previous state, you can pass a function to
setState. The function will receive the previous value, and return an updated value. Here’s an example of a counter component that uses both forms of setState:
function Counter({initialCount}) {
  const [count, setCount] = useState(initialCount);
  return (
    <>
      Count: {count}
      <button onClick={() => setCount(initialCount)}>Reset</button>
      <button onClick={() => setCount(prevCount => prevCount - 1)}>-</button>
      <button onClick={() => setCount(prevCount => prevCount + 1)}>+</button>
    </>
  );
}
2
3
4
5
6
7
8
9
10
11
# State in our Application
In our code we have two states: animalInput and result.
Therefore,
- each time the
animalInputstate changes, the component is rendered again.- The
animalInputchanges when the user types in the input field and when the API returns the result.
- The
- each time the
resultstate changes, the component is rendered again.- The
resultchanges when the API returns the result.
- The
# When the API returns the result
Let's review the code fragment:
async function onSubmit(event) {
    // ...
    const data = await response.json();
    setResult(data.result);
    setAnimalInput("");
}
2
3
4
5
6
Since data has arrived from the API, we can set the result state to the value of data.result:
setResult(data.result); // data just arrived from the API
The component will be rendered showing the new result.
Also, the effect of
setAnimalInput("");
is that the input component
<input  type="text" name="animal" placeholder="Enter an animal"
            value={animalInput}
            onChange={(e) => setAnimalInput(e.target.value)}
/>
2
3
4
will be rendered again with an empty value.
# When the user types in the input box
To understand the line onChange={(e) => setAnimalInput(e.target.value) we need to know
- that the
onchangeevent occurs when the value of the<input>has been changed. - The
targetproperty of the Eventeis a reference to the object onto which the event was dispatched, that is, the<input>. - The
setAnimalInput(e.target.value)will be executed each time the user types a character in theinputfield and will change the value of theanimalInputstate.
# References
- Read section Adding Interactivity (opens new window) of the React docs
- Section Managing State (opens new window) of the React docs
- Read the blog Everything You Need To Know About useState (opens new window)
# Continue learning React
Check out these other React topics:
- How React handles renders (opens new window) and how to use refs (opens new window)
- How to manage state (opens new window)
- How to use context for deeply nested data (opens new window)
- How to use React API hooks (opens new window) such as
useEffect()
# Stages of a web application
A web application code must be in one of these different stages:
- The environment where your code runs: Development vs. Production
- During development, you’re building and running the application on your local machine.
- Going to production is the process of making your application ready to be deployed and consumed by users.
- When your code runs: Build Time vs. Runtime
- Where rendering happens: Client vs. Server
# build
# The NextJS Compiler
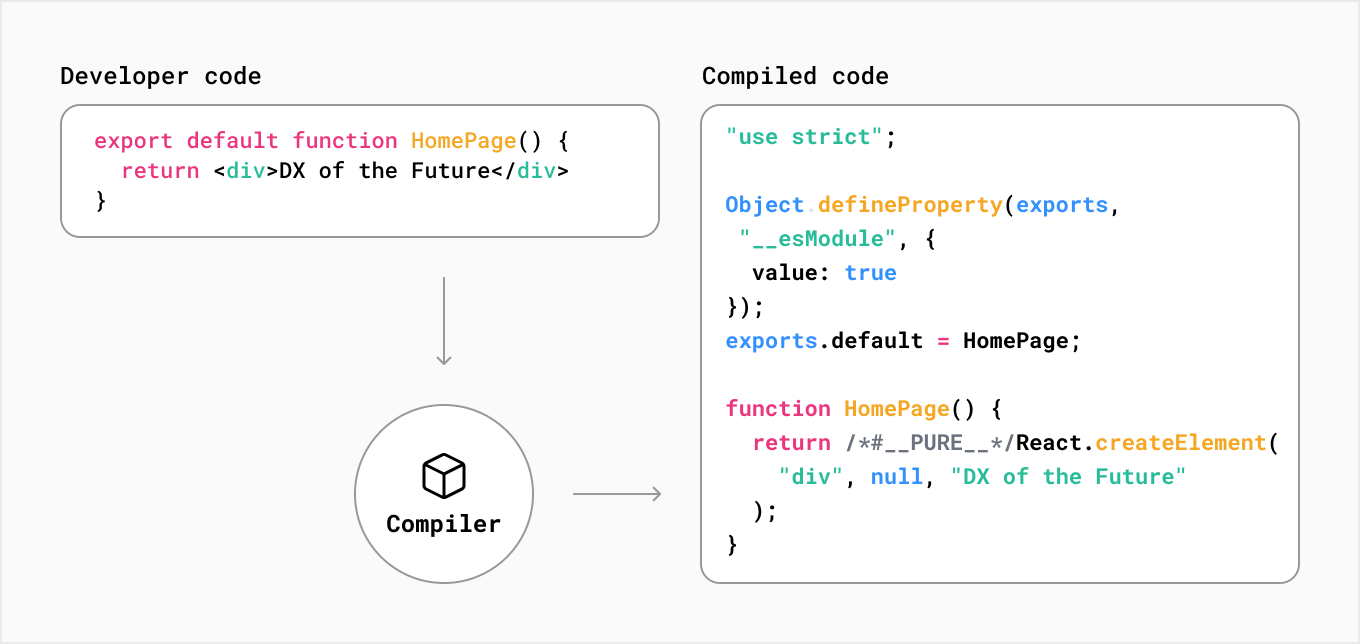
The build stage is the stage where the code is compiled and optimized for production. Among other thins the JSX code is converted to JavaScript.
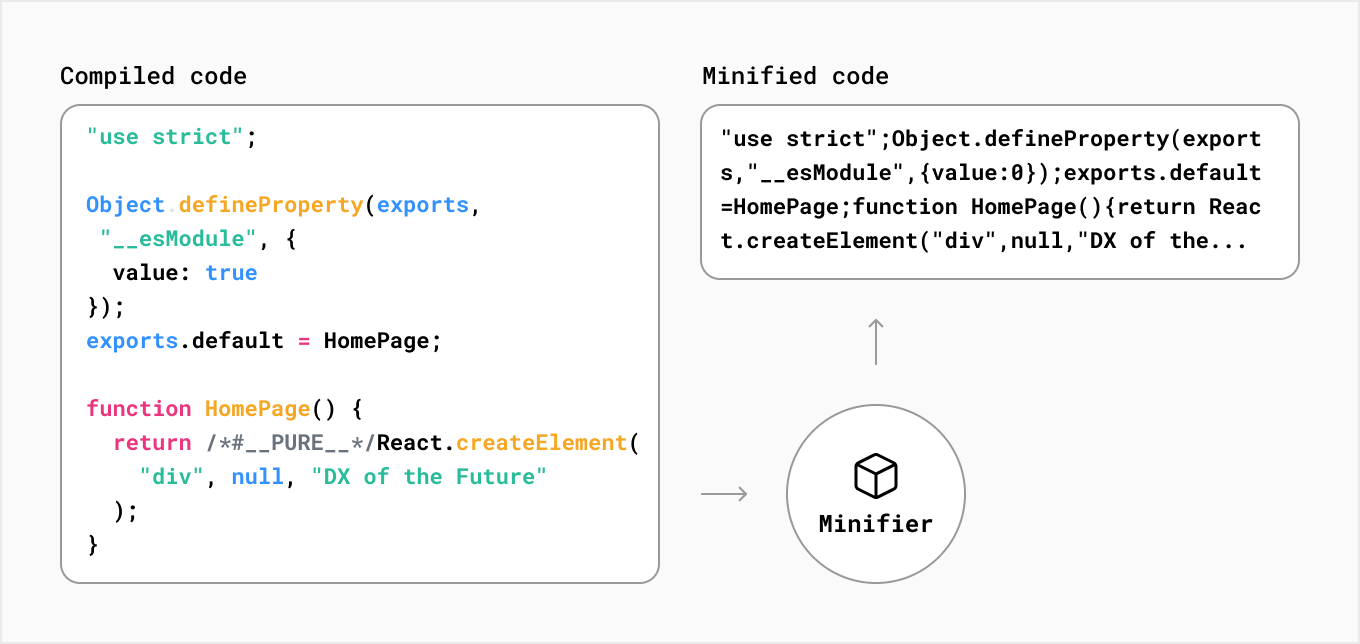
Another task is to minify the code. Minification refers to the process of removing unnecessary or redundant data without affecting how the resource is processed by the browser
- code comments
- formatting,
- removing unused code,
- using shorter variable and function names,
and so on. The goal is to reduce the size of the code and improve the performance of the application.
Another stage of the Next.js compiler is Bundling. Bundling is the process of resolving the web of dependencies and merging (or ‘packaging’) the files (or modules) into optimized bundles for the browser, with the goal of reducing the number of requests for files when a user visits a web page:
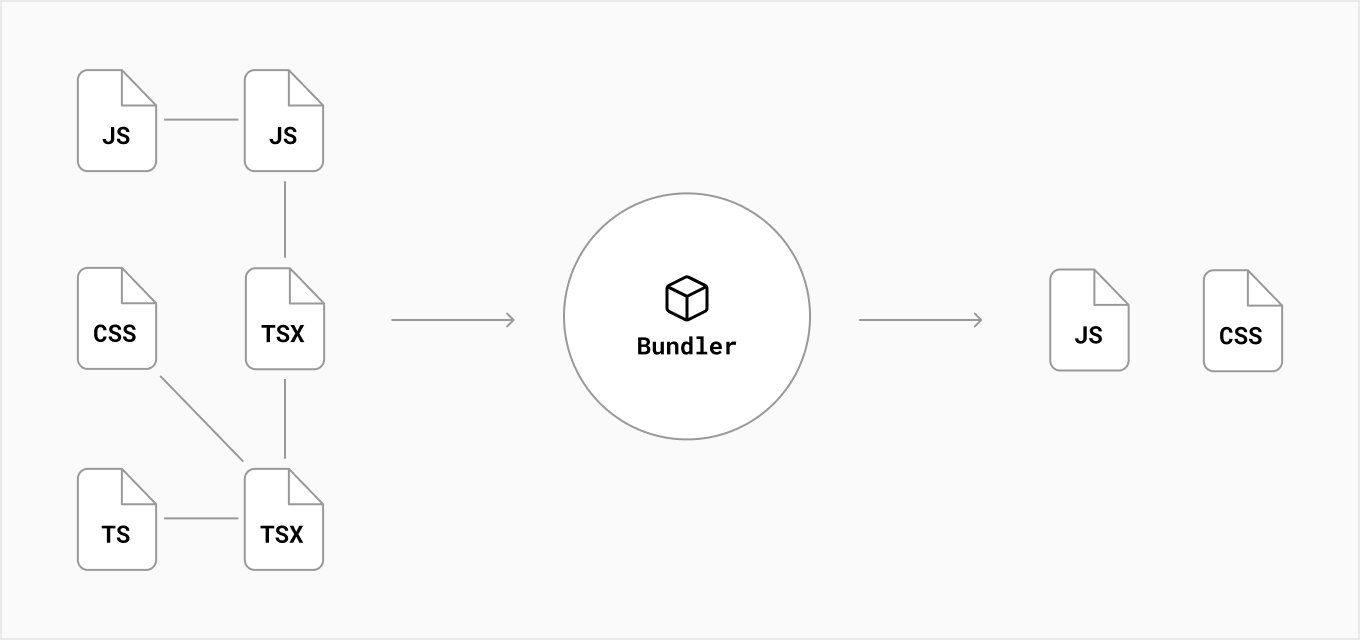
Developers usually split their applications into multiple pages that can be accessed from different URLs. Each of these pages becomes a unique entry point into the application.
Code-splitting is the process of splitting the application’s bundle into smaller chunks required by each entry point. The goal is to improve the application's initial load time by only loading the code required to run that page.

Next.js has built-in support for code splitting. Each file inside your pages/ directory will be automatically code split into its own JavaScript bundle during the build step.
Other optimizations:
- Any code shared between pages is also split into another bundle to avoid re-downloading the same code on further navigation.
- After the initial page load, Next.js can start pre-loading the code of other pages users are likely to navigate to.
# The command next build
The command next build creates an optimized production build of your application.
You can enable more verbose build output with the --debug flag in next build.
The output displays information about each route:
➜✗ npx next build --debug
info  - Loaded env from /Users/casianorodriguezleon/campus-virtual/2223/learning/openai-learning/openai-quickstart-node/.env
info  - Creating an optimized production build
info  - Compiled successfully
info  - Collecting page data
info  - Generating static pages (3/3)
info  - Finalizing page optimization

Page                                       Size     First Load JS
┌ ○ /                                      998 B          73.8 kB
├   └ css/fc2c832f265f4111.css             522 B
├ ○ /404                                   193 B            73 kB
└ λ /api/generate                          0 B            72.8 kB
+ First Load JS shared by all              72.8 kB
  ├ chunks/framework-e70c6273bfe3f237.js   42 kB
  ├ chunks/main-f65e66e62fc5ca80.js        28.6 kB
  ├ chunks/pages/_app-02d0f4839caa4a8e.js  1.36 kB
  └ chunks/webpack-69bfa6990bb9e155.js     769 B

λ  (Server)  server-side renders at runtime (uses getInitialProps or getServerSideProps)
○  (Static)  automatically rendered as static HTML (uses no initial props)

Redirects

┌ source: /:path+/
├ destination: /:path+
└ permanent: true
2
3
4
5
6
7
8
9
10
11
12
13
14
15
16
17
18
19
20
21
22
23
24
25
26
27
This generates the site in the .next directory.
# Production
next start starts the application in production mode.
The application should be compiled with next build before starting.
npx next start -p 4000

ready - started server on 0.0.0.0:4000, url: http://localhost:4000
info  - Loaded env from /Users/casianorodriguezleon/campus-virtual/2223/learning/openai-learning/openai-quickstart-node/.env
2
3
4
# Supabase
See the Supabase Introduction
See lessons 22 to 38 of the course https://netninja.dev/courses/next-13-masterclass/lectures/48541276 (opens new window)
# Authentication
- Intro to Supabase Auth https://netninja.dev/courses/next-13-masterclass/lectures/48541273i (opens new window)
- Making the Auth Forms https://netninja.dev/courses/next-13-masterclass/lectures/48541272i (opens new window)
- Signing up a New User https://netninja.dev/courses/next-13-masterclass/lectures/48541276i (opens new window)
- Email Redirect Callback https://netninja.dev/courses/next-13-masterclass/lectures/48541279i (opens new window)
- Getting the Current User https://netninja.dev/courses/next-13-masterclass/lectures/48541354i (opens new window)
- Logging Users Out https://netninja.dev/courses/next-13-masterclass/lectures/48541275i (opens new window)
- Logging Users In https://netninja.dev/courses/next-13-masterclass/lectures/48541274i (opens new window)
- Protecting Routes https://netninja.dev/courses/next-13-masterclass/lectures/48541278i (opens new window)
- Session Middleware https://netninja.dev/courses/next-13-masterclass/lectures/48541277i (opens new window)
See Authorization Code Flow with Proof Key for Code Exchange (PKCE) (opens new window)
# Adding a Database
- Setting up a Database https://netninja.dev/courses/next-13-masterclass/lectures/48541565i (opens new window)
- Adding New Tickets https://netninja.dev/courses/next-13-masterclass/lectures/48541562i (opens new window)
- Fetching Data from Supabase https://netninja.dev/courses/next-13-masterclass/lectures/48541564i (opens new window)
- Fetching Single Records https://netninja.dev/courses/next-13-masterclass/lectures/48541566i (opens new window)
- Checking the Ticket Author https://netninja.dev/courses/next-13-masterclass/lectures/48541563i (opens new window)
- Deleting Ticket Records https://netninja.dev/courses/next-13-masterclass/lectures/48541567i (opens new window)
- Building the Application https://netninja.dev/courses/next-13-masterclass/lectures/48541568i (opens new window)
- RLS & Policies https://netninja.dev/courses/next-13-masterclass/lectures/48541569i (opens new window)
- Intro to Server Components https://netninja.dev/courses/next-13-masterclass/lectures/48541623i (opens new window)
- Handling a POST Request in a Server Action https://netninja.dev/courses/next-13-masterclass/lectures/48541622i (opens new window)
- Using useFormStatus https://netninja.dev/courses/next-13-masterclass/lectures/48541619i (opens new window)
- Handling Server Errors https://netninja.dev/courses/next-13-masterclass/lectures/48541620i (opens new window)
- Calling Actions Using useTransition <https://netninja.dev/courses/next-13-masterclass/lectures/48541621i