# OAuth Authentication with GitHub as Oauth2 Provider and Netlify providing the Server
One challenge for frontend projects is handling authentication[1]. Making an informed decision about authentication authentication implies to get familiar with a lot of authentication jargon, like Single Sign On[2], and Multi Factor Authentication[3].
OAuth[4] is everywhere. The ubiquitous "Login with Facebook, Twitter, Github, etc." can be seen in almost every web app we come across. Tools like
- Auth0,
- Netlify Identity,
- Firebase and
- Okta
make it pretty simple to add these login buttons to most apps, so you can spend less time building out complex authentication frameworks and more time building your application.
The OAuth authentication process requires
- a HTTP server (here we will solve it using the server provided by netlify)
- The HTTP server must be able to send a signed request to a OAuth server
- a OAuth server (here we will use the GitHub OAuth server),
- the signed request is signed with a secret that you can never expose to the client side of your application.
Thus, we have several players:
- the developer of the application,
- the user of the application, the browser,
- the (web) application,
- the resource server and
- the OAuth server.
The picture only shows some of them
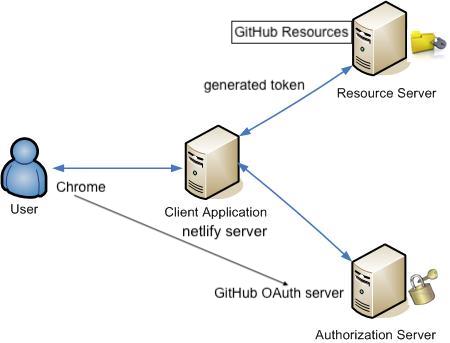
Netlify solves this problem by providing an integrated service in their servers that will sign the OAuth requests for our programs and give back an access token ready to use.
Netlify currently supports authentication with
- GitHub,
- GitLab, and
- Bitbucket.
# OAuth provider setup: GitHub
You need to create an API application and make note of the Client ID and a Client Secret so that you can use them in your Netlify configuration.
- In GitHub, go to your account Settings and select Developer Settings, then OAuth Apps or use this shortcut (opens new window).

Select Register a new application.
For the Authorization callback URL, enter https://api.netlify.com/auth/done. The other fields can contain anything you want.
On your new application’s GitHub overview page, make note of the Client ID.
Generate a Client Secret and make note of it for later. You can’t access this secret again.
# Netlify UI settings
Enable Identity in your site’s Netlify UI settings.
When you complete application registration with GitHub, you need to add the Client ID and Client Secret to your Netlify site:
Go to Site settings > Access control > OAuth.
Under Authentication Providers, select Install Provider.
Select GitHub and enter the Client ID and Client Secret from earlier, then save.
# Site usage example
Once you’ve configured an authentication provider, you can use it to obtain an access token in your application.
You can preview the OAuth user experience in this netlify-auth-demo repo (opens new window). It contains two examples: One with jQuery and another in Vanilla JS. The repo has been archived by the owner. The demos is running at https://auth-demo.netlify.app/ (opens new window)
Here’s an example of how to ask users to authenticate with GitHub and use the resulting token in your application’s calls to the GitHub API:
<!DOCTYPE html>
<html>

<head>
  <title>GitHub Authentication Example</title>

  <!-- Make sure to include Netlify’s authentication library -->
  <!-- Also available from npm as netlify-auth-providers -->
  <script src="https://unpkg.com/netlify-auth-providers"></script>
</head>

<body>
  <h1>GitHub Authentication Example:</h1>

  <p><a href="#" id="login">Authenticate</a></p>

  <p>Token: <pre id="output-token">Not authenticated yet</pre></p>

  <p>
    User login and emails: <br/>
    <pre id="output-email">Not authenticated yet</pre>
  </p>

  <a href="second-page.html">Go to second page</a>

  <script>
    const anchorTag = document.getElementById("login");
    const outputToken = document.getElementById("output-token");
    const outputEmail = document.getElementById("output-email");
    debugger;

    anchorTag.addEventListener("click", (event) => {
      event.preventDefault();

      const authenticator = new netlify.default({}); // {id: site id, base_url: by default is https://api.netlify.com

      authenticator.authenticate(
        // Set the OAuth provider and token scope
        // Provider can be "github", "gitlab", or "bitbucket"
        // The scopes available depend on your OAuth provider
        {
          provider: "github",
          scope: "user"
        },
        async function (error, data) {
          if (error) {
            outputToken.innerText =
              "Error Authenticating with GitHub: " + error;
          } else {
            outputToken.innerText =
              "Authenticated with GitHub. Access Token: " + data.token.substring(0, Math.min(10, data.token.length)) + "...";
            let userInfo = await loadGitHubUserEmails(data.token);

            outputEmail.innerText = userInfo.login + " " + userInfo.emails.join(", ");

            localStorage.setItem("login", userInfo.login);
            localStorage.setItem("emails", JSON.stringify(userInfo.emails));
          }
        }
      );
    });

    async function getGH(url, token) {
      let response = await fetch(url, {
        Accept: "application/vnd.github.v3+json",
        headers: {
          Authorization: `token ${token}`,
        },
      });
      return await response.json();
    }

    async function loadGitHubUserEmails(token) {

      let user = await getGH("https://api.github.com/user", token);
      let emails = await getGH("https://api.github.com/user/emails", token);
      emails = emails.map(e => e.email);
      let result = { login: user.login, emails: emails};
      return result;
    }
  </script>
</body>

</html>
2
3
4
5
6
7
8
9
10
11
12
13
14
15
16
17
18
19
20
21
22
23
24
25
26
27
28
29
30
31
32
33
34
35
36
37
38
39
40
41
42
43
44
45
46
47
48
49
50
51
52
53
54
55
56
57
58
59
60
61
62
63
64
65
66
67
68
69
70
71
72
73
74
75
76
77
78
79
80
81
82
83
84
OAuth tokens are scoped[5] to limit access. Each OAuth provider has different scopes you can use in your application. In the above GitHub example, the scope is set to user, which has read and write access to profile information.
If you don’t provide a scope, OAuth providers usually apply the default scope to your token. Default scopes typically only have read access to public information.
# User Identification Process
# Diagrams and Movies of All Oauth Flows
The video below shows the communication process when an user authenticates against an OAuth configured web app:
To see more Oauth flows visit Diagrams and Movies of All Oauth Flows[6] by Takahiko Kawasaki (may 26, 2017)
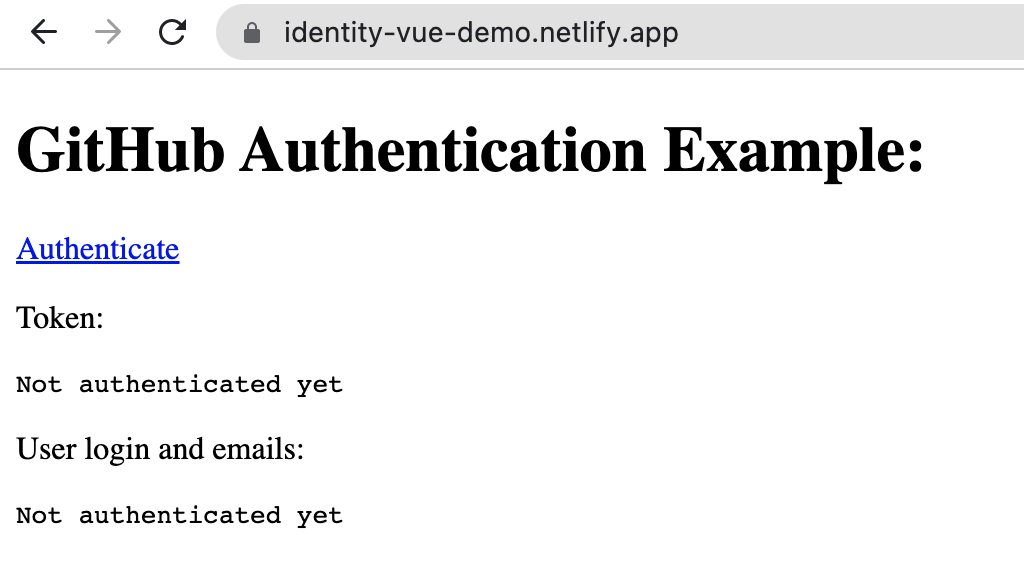
# Snapshots Sequence of our Netlify Example
- El usuario visita la página web de nuestra aplicación desplegada en netlify:
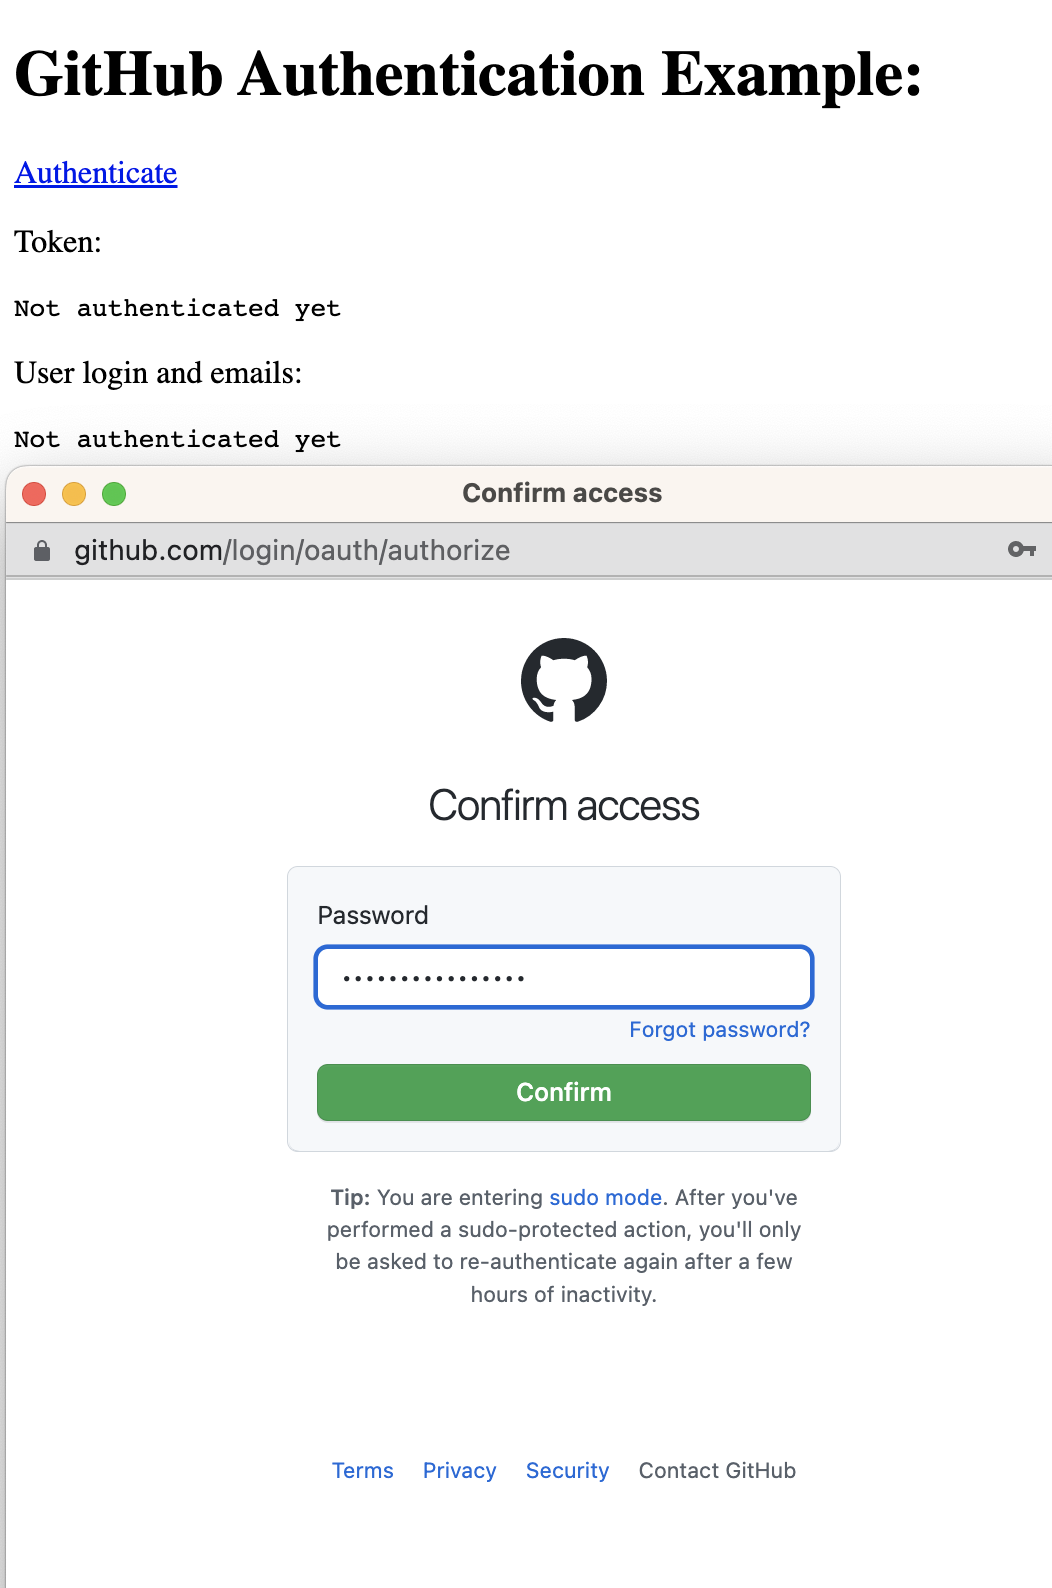
- El usuario ha hecho click en
authenticate. Se le redirige a GitHub con información adjunta de la web app.
Aparece el scope Personal user data: full access. Se le ofrece la oportunidad de dar acceso a las organizaciones de las que es admin o a solicitarlas a los admins de las mismas.

- GitHub le solicita al usuario que se autentique, a veces incluso si ya lo estaba.
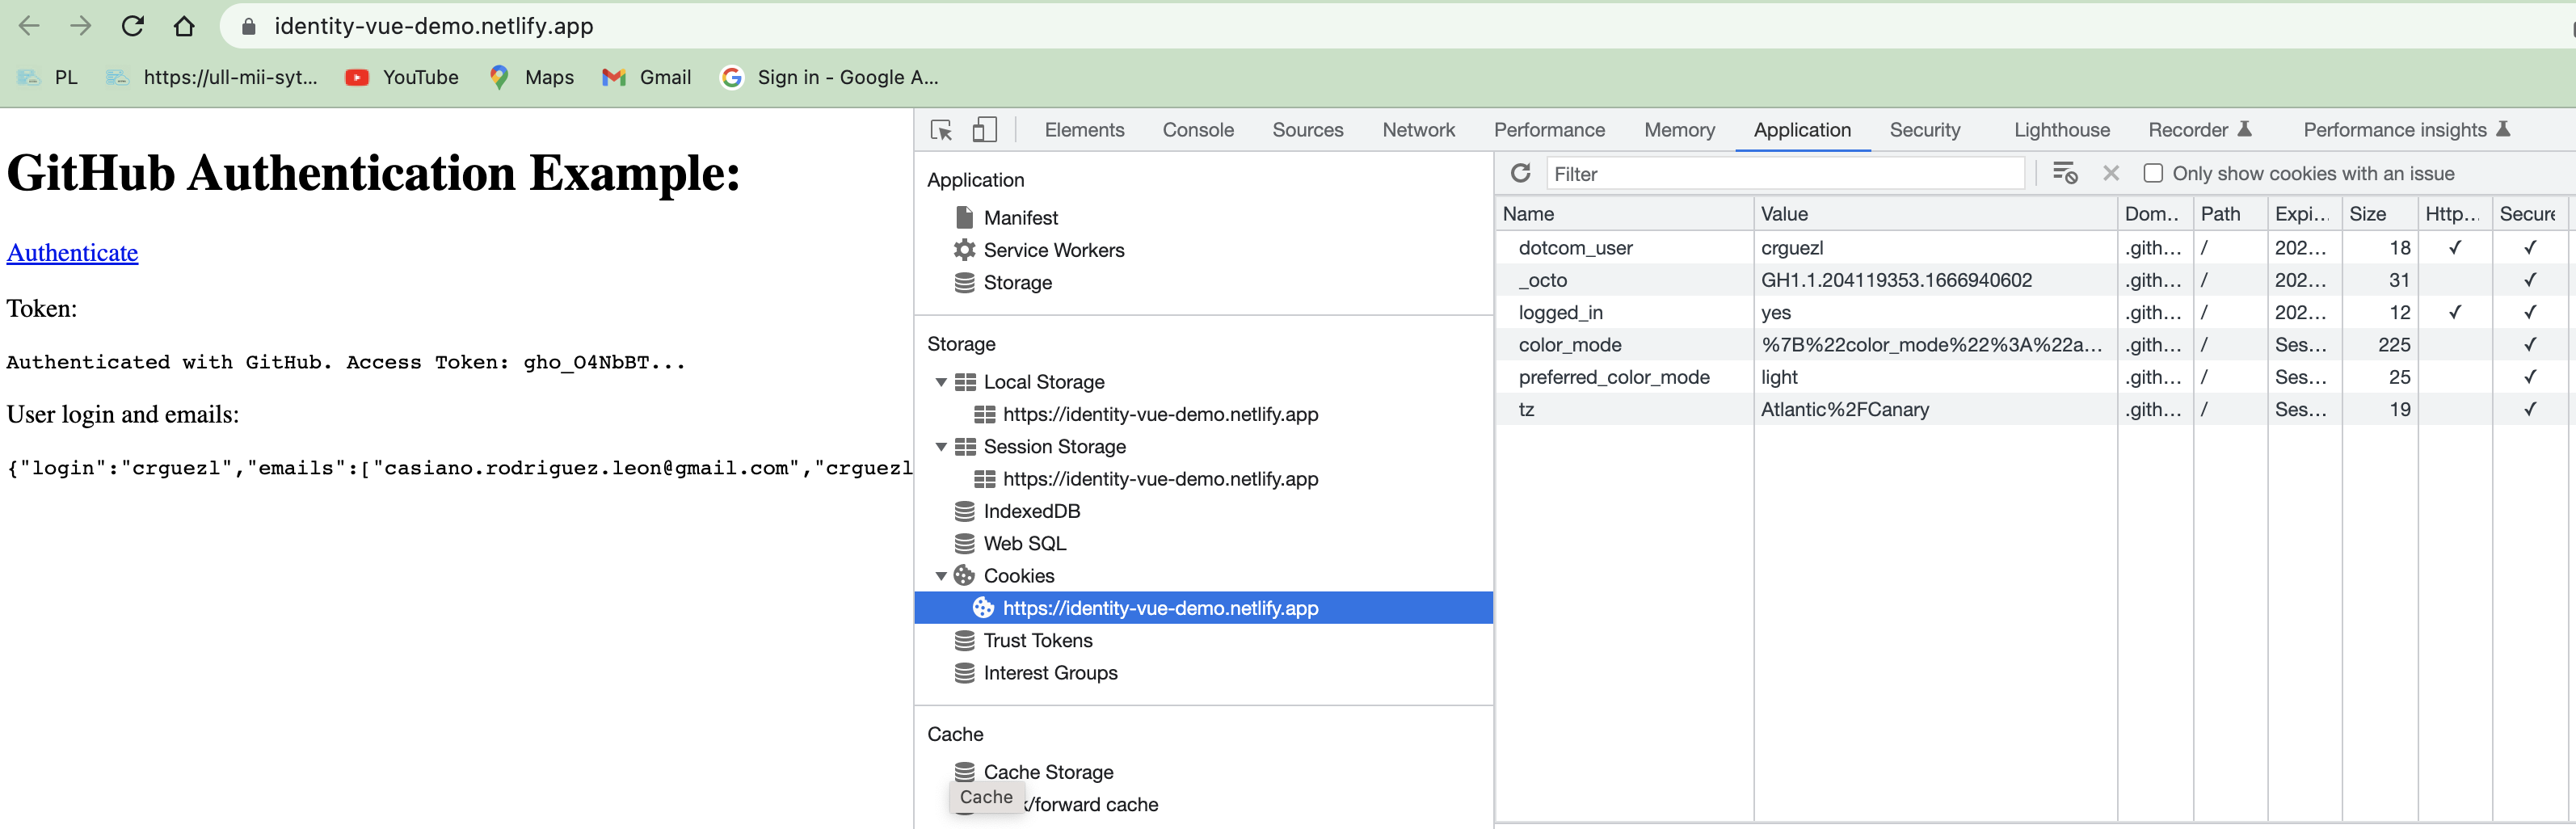
- A la app en netlify le llega el cookie/token de sesión generado y esta instancia de ejecución de la app está autenticada con los scopes con GitHub por lo que puede obtener datos privados:

- Podemos ver el cookie establecido y que hay un session storage y nuestra localstorage para la app en las herramientas del desarrollador de Chrome:
# References
Use OAuth provider tokens on your site (opens new window) is the original article
Repo ULL-MII-SYTWS/netlify-identity-demo-vue (opens new window) with the example
Getting Started with JWT and Identity (opens new window) at Netlify Blog January 23, 2018
Capítulo Oauth (opens new window) de los apuntes de Ruby del profesor Casiano Rodríguez (año 2015)
Saving data to Supabase and getting it back again (opens new window)
By using a serverless function we avoid sending the authentication credentials out over the wire to our client-side code. This means that we can use the service API without leaking sensitive details
EASY Web App Auth with Netlify Identity! by Brian Morrison
# Footnotes
Authentication is the basis for securing data and content online. It enables a client and/or server to assert the ownership of a credential before allowing a user to access confidential information. ↩︎
Single Sign On (SSO) is the authentication process that enables users to authenticate once and gain access to multiple applications or services. In order to achieve this, SSO utilizes a Central Server to orchestrate signing into multiple applications. ↩︎
Multi Factor Authentication (MFA) is a multi (usually two) step process for verifying a user’s identity when they sign into an application. The first step is to verify the user’s identity with a username and password. The second step is to verify the user’s identity with a second factor, such as a code sent to their phone or a fingerprint scan. ↩︎
OAuth is an open standard for authorization, commonly used as a way for Internet users to authorize websites or applications to access their information on other websites but without giving them the passwords. This mechanism is used by companies such as Google, Facebook, Microsoft and Twitter to permit the users to share information about their accounts with third party applications or websites. ↩︎
Scopes are a way to limit an application’s access to a user’s account. Scopes let you specify exactly what type of access you need. Scopes limit access for OAuth tokens. For example, if an application only needs to read repository data, the application can be granted the scope of repo, which will allow it to read all public and private repository data. If the application needs to be able to create, edit, and delete repositories, the application can be granted the scope of repo, which will allow it to read, create, edit, and delete all public and private repository data. ↩︎
Diagrams and Movies of All Oauth Flows (opens new window) by Takahiko Kawasaki (may 26, 2017) ↩︎